Draw a Circle in Jscrollpane With Two for Loops
Tutorials / Coffee Tutorials / Swing
Swing
tutorial java
- A Brief History
- JFrame
- Components
- JButton
- JLabel
- JTextArea
- Other Components
- JPanel
- Layout Managers
- Nesting Layouts
- Consequence Listeners
- Custom Painting
- Timers
- Other Resources
- Homework
So far, all of our Java programs have been command line programs, which we interacted with through the command prompt, if we interacted with the program at all.
Control line programs are fine for simple tasks or for programs that don't really interact with the user, but if yous want to interact with the user, then you probably desire to create a graphical user interface, or GUI (pronounced "gee-you-eye" or "gooey"). GUIs are the types of programs you're probably more than accustomed to using: the types of programs that have windows and buttons and text fields instead of only using the command prompt.
Coffee contains a bunch of classes that assistance you create GUIs, and this tutorial focuses on a set of classes that make up a library chosen Swing.
Note: Swing is not an acronym! (Neither is Java, for that matter.)
A Cursory History
Java contains three unlike GUI libraries, which are each just a bunch of classes in the Java API that you tin can use. Trying to empathize how all of these classes fit together can be confusing, so here's a brief summary of how they piece of work:
-
The Abstract Window Toolkit, or AWT, has been a role of Java since day one, way dorsum in 1996. AWT works by passing in "native" calls to your reckoner. And then if you create a checkbox in AWT, you're really telling your operating system to create a checkbox. All of the AWT classes are in the
java.awtpackage. -
The downside of that approach is that your program will expect different on different computers: a checkbox on Linux looks different from a checkbox on Windows. This tin can make it harder to layout your plan or have a consequent experience across different platforms. To fix this, Swing was added to Java in 1998. The idea backside Swing is that instead of telling your calculator to create a checkbox, Swing draws the checkbox itself. That fashion, the checkbox volition look the same on different operating systems. The Swing classes are in the
javax.swingpackage. Simply Swing was built on top of AWT, so you'll see Swing code using classes from thecoffee.awtbundle also. -
JavaFX was originally developed as an external library in 2008, and it was included in Java in 2014. JavaFX focuses on modern GUI features, similar more animations, CSS styling, and using a computer'south graphics card to handle the rendering. JavaFX classes are in the
javafxbundle, which is in a.jarfile that comes with Coffee.
Fifty-fifty though JavaFX is newer, I'thousand focusing on Swing for a couple reasons:
-
The do good of Swing existence around longer is that there are a ton of resource for learning more about it. If you're wondering how to do something in Swing, chances are somebody has asked your question on Stack Overflow.
-
I remember Swing is a great way to become more comfortable with OOP, inheritance, and general programme catamenia. So even if your end goal with programming isn't Swing, it's a good idea to spend some time here considering it'll help yous larn other stuff you lot need to be learning.
-
I know Swing amend than I know JavaFX.

Ane more matter worth noting: the above libraries, including Swing, are for creating a desktop application, which is a program that runs on your computer, not in a webpage. Call up of opening upward the Spotify awarding, not going to Spotify's website. But similar I said above, fifty-fifty if your end goal isn't creating a desktop application in Java, information technology's nonetheless a good idea to learn this stuff since it teaches you other stuff you need to know anyhow.
Enough history, to the tutorial!
JFrame
The first pace to creating a GUI is displaying a window, so you can collaborate with that instead of the command prompt. The JFrame class is Swing's representation of a window, and it works like this:
import javax.swing.JFrame ; public class MyGui { public static void main ( String [] args ){ JFrame frame = new JFrame ( "Happy Coding" ); frame . setDefaultCloseOperation ( JFrame . EXIT_ON_CLOSE ); frame . setSize ( 300 , 300 ); frame . setVisible ( true ); } } Let's take it i line of code at a time:
JFrame frame = new JFrame("Happy Coding"); This line of lawmaking creates an instance of the JFrame class, passing in a parameter that sets the title of the window.
frame.setDefaultCloseOperation(JFrame.EXIT_ON_CLOSE); This makes it so when you lot click the X button in the window, your program exits. If y'all don't do this, your programme could go on running in the groundwork even later the window closes, which y'all probably don't desire.
This line of code sets the width and summit of the window in pixels. Try passing in different values to change the size of the window.
Finally, this actually pops the window upward and shows it to the user. Notice that the program continues running fifty-fifty later on our main() part ends!
Unremarkably you lot wouldn't put all of your code in the chief() method like that, except for very simple programs like this one. You would probably do something like this:
import javax.swing.JFrame ; public grade MyGui { public MyGui (){ JFrame frame = new JFrame ( "Happy Coding" ); frame . setDefaultCloseOperation ( JFrame . EXIT_ON_CLOSE ); frame . setSize ( 300 , 300 ); frame . setVisible ( true ); } public static void main ( Cord [] args ){ new MyGui (); } } This lawmaking moves the logic from the main() function into the class, and the primary() function simply creates an case of that grade. This isn't much dissimilar from putting it all in the master() method, merely this volition make more sense as your code gets more than complicated.
You might besides split your lawmaking up similar this:
import javax.swing.JFrame ; public class MyGui { private JFrame frame ; public MyGui (){ frame = new JFrame ( "Happy Coding" ); frame . setDefaultCloseOperation ( JFrame . EXIT_ON_CLOSE ); frame . setSize ( 300 , 300 ); } public void show (){ frame . setVisible ( truthful ); } public static void master ( String [] args ){ MyGui myGui = new MyGui (); myGui . show (); } } This code does the same matter, but it splits the code upwards: it initializes the frame variable in the constructor, and it shows it in the show() function.
In any case, you would save this to a file named MyGui.java so you'd compile and run information technology from the command line, just similar the other programs we've seen and then far. (Yes, yous still have to compile and run using the command line. We'll talk about how to create an executable file in a subsequently tutorial!)
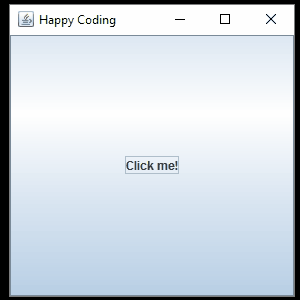
The code causes a window to show:

Our window is blank, because nosotros oasis't added anything to it yet.
Components
In addition to the JFrame class, Swing has a bunch of classes that stand for dissimilar components yous can add to a window: stuff similar buttons, labels, checkboxes, and text areas. To utilise a component, yous call frame.add(component); to add it to the window. We'll see some examples beneath.
As always, your best friend is the Java API, just here are a few of the most unremarkably used classes:
JButton
The JButton class is Swing's representation of a clickable button. Permit's add it to our GUI:
import javax.swing.JFrame ; import javax.swing.JButton ; public course MyGui { public static void main ( String [] args ){ JFrame frame = new JFrame ( "Happy Coding" ); frame . setDefaultCloseOperation ( JFrame . EXIT_ON_CLOSE ); JButton push button = new JButton ( "Click me!" ); frame . add ( push ); frame . setSize ( 300 , 300 ); frame . setVisible ( true ); } } First we construct a JFrame and make information technology so the program ends when we shut it. And so nosotros create an instance of the JButton form, passing in an argument that sets the text of the button. Then we add together the button the the window. Finally, nosotros set the size of the window and show it.
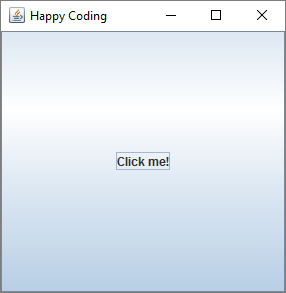
Correct now the button just takes up the whole window, and aught happens when yous click it. We'll fix that in a second.
JLabel
The JLabel class is Swing's representation of an undeditable text label. Let's add together it to our GUI:
import javax.swing.JFrame ; import javax.swing.JLabel ; public class MyGui { public static void main ( String [] args ){ JFrame frame = new JFrame ( "Happy Coding" ); frame . setDefaultCloseOperation ( JFrame . EXIT_ON_CLOSE ); JLabel characterization = new JLabel ( "Hello world!" ); frame . add together ( label ); frame . setSize ( 300 , 300 ); frame . setVisible ( true ); } } This is most the same as the JButton code, except now we're creating an instance of JLabel and adding it to the JFrame.
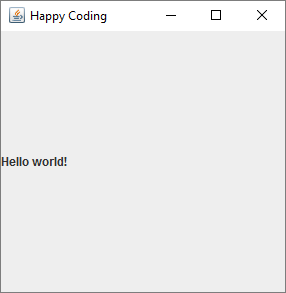
Right now the label is left-aligned and uses the default font. We can prepare that by calling functions on our JLabel instance:
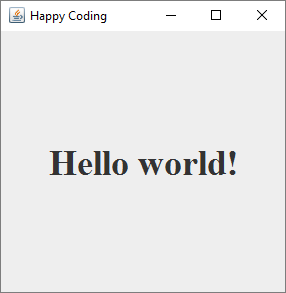
import javax.swing.JFrame ; import javax.swing.JLabel ; import java.awt.Font ; public class MyGui { public static void main ( String [] args ){ JFrame frame = new JFrame ( "Happy Coding" ); frame . setDefaultCloseOperation ( JFrame . EXIT_ON_CLOSE ); JLabel label = new JLabel ( "Howdy world!" ); label . setFont ( new Font ( "Serif" , Font . Assuming , 36 )); characterization . setHorizontalAlignment ( JLabel . CENTER ); frame . add together ( label ); frame . setSize ( 300 , 300 ); frame . setVisible ( true ); } } At present our JLabel has a big assuming serif font, which information technology displays using a center alignment.
You can observe other ways to customize your components by looking them up in the Java API! Attempt changing the text color of the JLabel.
JTextArea
The JTextArea class is Swing'south representation of a box of text that the user can edit.
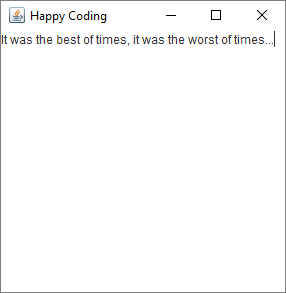
import javax.swing.JFrame ; import javax.swing.JTextArea ; public course MyGui { public static void principal ( String [] args ){ JFrame frame = new JFrame ( "Happy Coding" ); frame . setDefaultCloseOperation ( JFrame . EXIT_ON_CLOSE ); JTextArea textArea = new JTextArea ( "Information technology was the all-time of times, it was the worst of times..." ); frame . add together ( textArea ); frame . setSize ( 300 , 300 ); frame . setVisible ( truthful ); } } This gives the states a box of text that the user can type into:
Again, you can customize this component using functions you notice in the Coffee API. Try changing the font!
Other Components
This tutorial isn't meant to show y'all every single matter y'all tin do with Swing. It's meant to bear witness you the nuts and then y'all can employ the Java API to figure out exactly how to do what you desire. Hither are just a few other components you should check out:
-
JCheckBoxandJRadioButtonrepresent checkboxes and radio buttons. -
JTextFieldgives you a one-line text area. -
JComboBoxandJListallow the user to select items from lists. -
JMenulets you lot add menus to your window. -
JProgressBarshows a progress bar. -
JSliderandJSpinnerlet the user conform a value. -
JTableshows a table of information. -
JScrollPaneadds scroll confined to content that's as well large to fit in the window.
To learn how to use these components, wait them up in the Coffee API and read about the constructors, functions, and variables they contain. And then put together a little example program that tests the component out before integrating it into your main project.
JPanel
Then far, we've just added a unmarried component to our window. That'south not very exciting, only we can utilize the JPanel course to add multiple components to a window. JPanel is a component that holds other components. To employ a JPanel, you'd follow this bones flow:
- Create an case of
JPanel. - Add components to the
JPanelcase. - Add that
JPanelto theJFrame.
It looks like this:
import javax.swing.JFrame ; import javax.swing.JPanel ; import javax.swing.JButton ; import javax.swing.JLabel ; import javax.swing.JTextArea ; public class MyGui { public static void main ( String [] args ){ JFrame frame = new JFrame ( "Happy Coding" ); frame . setDefaultCloseOperation ( JFrame . EXIT_ON_CLOSE ); JPanel panel = new JPanel (); JButton buttonOne = new JButton ( "I'chiliad a JButton!" ); console . add together ( buttonOne ); JLabel label = new JLabel ( "I'1000 a JLabel!" ); panel . add ( label ); JTextArea textArea = new JTextArea ( "I'm a JTextArea!" ); panel . add ( textArea ); JButton buttonTwo = new JButton ( "I'm another JButton!" ); panel . add ( buttonTwo ); frame . add together ( panel ); frame . setSize ( 300 , 300 ); frame . setVisible ( truthful ); } } This code creates a JFrame, and then creates a JPanel instance. Information technology adds four different components to the JPanel, and and then it adds that JPanel to the JFrame. Finally, it sets the size of the JFrame and shows it.
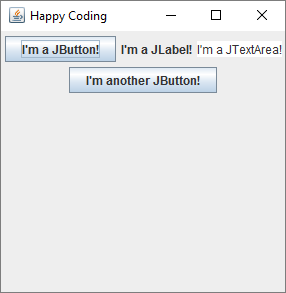
Past default, the components are displayed one after the other, and they wrap to multiple rows if the window is not wide plenty to fit them. Try irresolute the width of the window to see the components rearrange themselves.
Layout Managers
You probably don't want your components to be display similar that though. You lot can modify how they're arranged using layout managers, which are classes that tell a JPanel how to arrange components.
To use a layout manager, you beginning create an example of the layout manager you want to use, and and then you pass information technology into the setLayout() function of your JPanel. It looks like this:
JPanel console = new JPanel (); BorderLayout borderLayoutManager = new BorderLayout (); panel . setLayout ( borderLayoutManager ); Of course, you tin can also laissez passer the case directly into the office instead of storing it in a variable first:
JPanel panel = new JPanel (); console . setLayout ( new BorderLayout ()); And the JPanel constructor can accept a layout manager as an argument:
JPanel console = new JPanel ( new BorderLayout ()); In any case, this code uses a BorderLayout layout manager, which splits the JPanel up into 5 different areas: the top of the JPanel is North, the bottom is SOUTH, the left is WEST, the right is E, and the heart is, well, CENTER. You can pass these values (which are static variables in the BorderLayout course) into the add() function forth with the component to accommodate them. Putting it all together, it looks similar this:
import javax.swing.JFrame ; import javax.swing.JPanel ; import javax.swing.JButton ; import javax.swing.JLabel ; import javax.swing.JTextArea ; import java.awt.BorderLayout ; public class MyGui { public static void main ( String [] args ){ JFrame frame = new JFrame ( "Happy Coding" ); frame . setDefaultCloseOperation ( JFrame . EXIT_ON_CLOSE ); JPanel panel = new JPanel (); BorderLayout borderLayoutManager = new BorderLayout (); panel . setLayout ( borderLayoutManager ); JButton buttonOne = new JButton ( "I'1000 a JButton!" ); panel . add together ( buttonOne , BorderLayout . NORTH ); JLabel label = new JLabel ( "I'm a JLabel!" ); panel . add together ( characterization , BorderLayout . S ); JTextArea textArea = new JTextArea ( "I'm a JTextArea!" ); panel . add together ( textArea , BorderLayout . EAST ); JButton buttonTwo = new JButton ( "I'thousand another JButton!" ); panel . add together ( buttonTwo , BorderLayout . WEST ); frame . add together ( console ); frame . setSize ( 300 , 300 ); frame . setVisible ( truthful ); } } This code uses a BorderLayout layout manager, and adds each component to a different section of the JPanel.
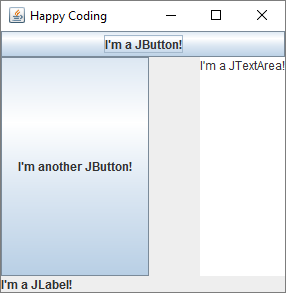
Notice that the components stay in their positions, even when y'all resize the window. Also discover that the size of each component is set by the layout.
At that place are a agglomeration of other layout managers, and this tutorial is a great identify to learn more about them. Here's an example that uses BoxLayout:
import javax.swing.JFrame ; import javax.swing.JPanel ; import javax.swing.JButton ; import javax.swing.JLabel ; import javax.swing.JTextArea ; import javax.swing.BoxLayout ; public class MyGui { public static void principal ( String [] args ){ JFrame frame = new JFrame ( "Happy Coding" ); frame . setDefaultCloseOperation ( JFrame . EXIT_ON_CLOSE ); JPanel panel = new JPanel (); BoxLayout boxLayoutManager = new BoxLayout ( panel , BoxLayout . Y_AXIS ); panel . setLayout ( boxLayoutManager ); JButton buttonOne = new JButton ( "I'g a JButton!" ); panel . add ( buttonOne ); JLabel characterization = new JLabel ( "I'one thousand a JLabel!" ); panel . add together ( characterization ); JTextArea textArea = new JTextArea ( "I'm a JTextArea!" ); panel . add ( textArea ); JButton buttonTwo = new JButton ( "I'm another JButton!" ); panel . add ( buttonTwo ); frame . add ( panel ); frame . setSize ( 300 , 300 ); frame . setVisible ( truthful ); } } This code sets a BoxLayout layout manager, which arranges the components in a single line, either horizontally or vertically depending on the value you pass into the BoxLayout constructor. Effort changing the parameter to BoxLayout.X_AXIS to see what happens!
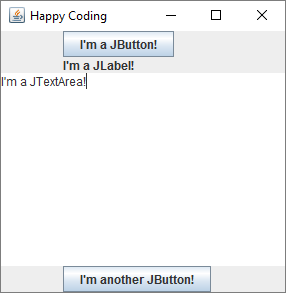
Again, notice that the size of the components depends on the layout you use! This can be a piffling confusing, but it helps make sure your components practise reasonable things when the user resizes the window.
Nesting Layouts
Recall that nosotros can add components to JPanel instances, and JPanel is itself a component. That means we can add components to a JPanel with one layout manager, and so add that JPanel to another JPanel with a different layout manager! This is chosen nesting layouts, and information technology lets us parcel up multiple components and treat them as a single block in the overall layout.
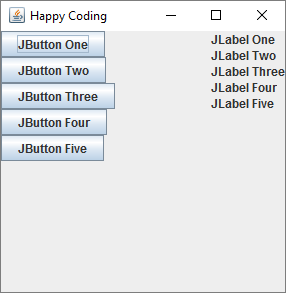
If that sounds disruptive, think about it this way: we can create a JPanel with a vertical BoxLayout that contains v JButton instances. And so nosotros can create another JPanel with a BorderLayout layout manager, and we can add the first JPanel to the West department of the second JPanel!
import javax.swing.JFrame ; import javax.swing.JPanel ; import javax.swing.JButton ; import javax.swing.JLabel ; import javax.swing.BoxLayout ; import java.awt.BorderLayout ; public class MyGui { public static void master ( Cord [] args ){ JFrame frame = new JFrame ( "Happy Coding" ); frame . setDefaultCloseOperation ( JFrame . EXIT_ON_CLOSE ); JPanel leftPanel = new JPanel (); BoxLayout leftBoxLayoutManager = new BoxLayout ( leftPanel , BoxLayout . Y_AXIS ); leftPanel . setLayout ( leftBoxLayoutManager ); leftPanel . add ( new JButton ( "JButton 1" )); leftPanel . add ( new JButton ( "JButton Two" )); leftPanel . add ( new JButton ( "JButton Three" )); leftPanel . add together ( new JButton ( "JButton Four" )); leftPanel . add ( new JButton ( "JButton V" )); JPanel rightPanel = new JPanel (); BoxLayout rightBoxLayoutManager = new BoxLayout ( rightPanel , BoxLayout . Y_AXIS ); rightPanel . setLayout ( rightBoxLayoutManager ); rightPanel . add ( new JLabel ( "JLabel One" )); rightPanel . add ( new JLabel ( "JLabel Two" )); rightPanel . add ( new JLabel ( "JLabel 3" )); rightPanel . add ( new JLabel ( "JLabel Four" )); rightPanel . add together ( new JLabel ( "JLabel V" )); JPanel mainPanel = new JPanel ( new BorderLayout ()); mainPanel . add ( leftPanel , BorderLayout . WEST ); mainPanel . add ( rightPanel , BorderLayout . EAST ); frame . add ( mainPanel ); frame . setSize ( 300 , 300 ); frame . setVisible ( true ); } } This lawmaking creates a JPanel with a vertical BoxLayout, then adds five JButton components to it. Then it creates another JPanel with another vertical BoxLayout, and it adds five JLabel components to information technology. Then information technology creates a tertiary JPanel with a BorderLayout layout manager, and it adds the first ii JPanel components to it.
In other words, it treats each set of components as a block that it lays out in the main window layout.
In that location isn't really a limit to how much nesting y'all can have!
Event Listeners
So far, our components haven't done anything other than display. Nothing happens when we click a button, for example. We can change that by calculation issue listeners to our components.
Event listeners are objects that define functions that are chosen when a certain event happens: when the user clicks the mouse or presses a central on the keyboard, for example.
For example, let's create an ActionListener, which lets us trigger a function when the user clicks a push button. ActionListener is an interface, then the first step is to create a class that implements that interface:
import java.awt.event.ActionListener ; import java.awt.event.ActionEvent ; public class SimpleActionListener implements ActionListener { public void actionPerformed ( ActionEvent upshot ){ System . out . println ( "Clicked!" ); } } The ActionListener interface requires a unmarried function named actionPerformed(), and our SimpleActionListener class implements the interface by defining that role.
Now that nosotros accept a class that implements ActionListener, we can create an instance of this class and add it to a JButton:
import javax.swing.JFrame ; import javax.swing.JButton ; public class MyGui { public static void main ( String [] args ){ JFrame frame = new JFrame ( "Happy Coding" ); frame . setDefaultCloseOperation ( JFrame . EXIT_ON_CLOSE ); JButton push = new JButton ( "Click me!" ); frame . add together ( button ); SimpleActionListener listener = new SimpleActionListener (); push . addActionListener ( listener ); frame . setSize ( 300 , 300 ); frame . setVisible ( true ); } } This code creates a JFrame and adds a JButton to information technology. And then information technology creates an example of our SimpleActionListener course and passes information technology into the addActionListener() function of our JButton example. Then the code sets the size of the window and displays it.
At present, when we click the push button, the actionPerformed() function inside our SimpleActionListener course is called, and "Clicked!" is printed to the console.
We probably want to exercise something a picayune more involved than just printing something to the panel when the user clicks the push, though. Let'due south say nosotros want to change the text on the push button to show how many times the user has clicked. To do that, we need a reference to the JButton instance inside our SimpleActionListener class.
One fashion to go that reference is through the ActionEvent instance passed in as a parameter to the actionEvent() office. That class contains a getSource() function, which returns the object that generated the result: in our instance, this is our JButton example! Simply the reference is an Object reference, so you accept to cast it to JButton to use functions from the JButton form.
That might audio disruptive, simply it looks like this:
import java.awt.event.ActionListener ; import java.awt.upshot.ActionEvent ; import javax.swing.JButton ; public class SimpleActionListener implements ActionListener { private int clicks = 0 ; public void actionPerformed ( ActionEvent issue ){ clicks ++; JButton clickedButton = ( JButton ) event . getSource (); clickedButton . setText ( "Clicks: " + clicks ); } } Now our class contains a clicks variable that keeps track of how many times the user has clicked. In the actionPerformed() part, that variable is incremented. Then the lawmaking calls the event.getSource() role, casts the returned reference to JButton and stores it in the clickedButton variable. Finally, the lawmaking calls the setText() part of that JButton to display the click count. And since the clickedButton variable points to the same JButton instance that we've added to our JFrame, our displayed button's text is updated.
But what if we wanted to update a different component that wasn't the source of the event? For instance, what if we want to update a JLabel whenever we click a JButton? To do that, we take to laissez passer a reference to the JLabel ourselves. We could utilise a setter function, or we could use a constructor that took the JLabel as an statement:
import java.awt.upshot.ActionListener ; import java.awt.upshot.ActionEvent ; import javax.swing.JLabel ; public course SimpleActionListener implements ActionListener { private int clicks = 0 ; individual JLabel label ; public SimpleActionListener ( JLabel label ){ this . label = label ; } public void actionPerformed ( ActionEvent event ){ clicks ++; label . setText ( "Clicks: " + clicks ); } } Now our SimpleActionListener class takes a JLabel statement in its constructor, and it updates the text of that JLabel whenever the actionPerformed() office is called.
Back in our master() function, nosotros take to create a JLabel case, add it to the window, and laissez passer it into the constructor of our SimpleActionListener form. Putting it all together, information technology looks like this:
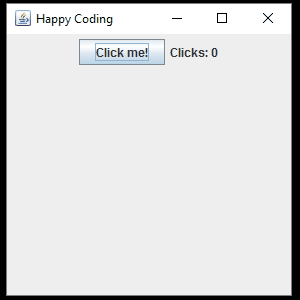
import javax.swing.JFrame ; import javax.swing.JPanel ; import javax.swing.JButton ; import javax.swing.JLabel ; public class MyGui { public static void main ( String [] args ){ JFrame frame = new JFrame ( "Happy Coding" ); frame . setDefaultCloseOperation ( JFrame . EXIT_ON_CLOSE ); JPanel panel = new JPanel (); JButton button = new JButton ( "Click me!" ); panel . add ( button ); JLabel label = new JLabel ( "Clicks: 0" ); panel . add ( characterization ); SimpleActionListener listener = new SimpleActionListener ( characterization ); push . addActionListener ( listener ); frame . add together ( panel ); frame . setSize ( 300 , 300 ); frame . setVisible ( truthful ); } } This code creates a JFrame and a JPanel, and then information technology creates a JButton and a JLabel and adds both of them to the JPanel. The code and so passes the JLabel into the SimpleActionListener constructor, and it adds that listener to the JButton. And so information technology adds the JPanel to the JFrame and shows the window.
Now when the user clicks the button, the text on the JLabel is updated.
The in a higher place examples use a named, summit-level class that implements the ActionListener interface, simply rememeber that you can also implement an interface using inner classes and anonymous classes. This lets u.s.a. include our listener lawmaking with our GUI code, like this:
ActionListener listener = new ActionListener (){ int clicks = 0 ; public void actionPerformed ( ActionEvent event ){ clicks ++; characterization . setText ( "Clicks: " + clicks ); } }; button . addActionListener ( listener ); At present instead of using a separate SimpleActionListener class, we're using an bearding form that implements the ActionListener interface. The logic is the same, but note that we're no longer passing the JLabel into a constructor. Considering this is an anonymous inner grade, it has admission to the variables in its enclosing scope (in this case, the main() function). That means it can reference the characterization variable straight.
You can as well shorten that into a single statement:
push . addActionListener ( new ActionListener (){ int clicks = 0 ; public void actionPerformed ( ActionEvent event ){ clicks ++; label . setText ( "Clicks: " + clicks ); } }); At present instead of storing the instance of our anonymous class in a variable, we pass it directly into the addActionListener() role.
Anonymous classes are often used when specifying listeners, which lets usa keep logic related to a unmarried component together, and avoids creating a bunch of classes we only use once.
There are a bunch of different kinds of event listeners, and you can add multiple listeners to the same component. You can as well add listeners to the overall JFrame window. Here's an example that adds a MouseListener and a KeyListener to the JFrame:
import javax.swing.JFrame ; import javax.swing.JPanel ; import javax.swing.JButton ; import javax.swing.JLabel ; import java.awt.upshot.MouseListener ; import java.awt.event.MouseEvent ; import java.awt.issue.KeyListener ; import java.awt.event.KeyEvent ; public class MyGui { public static void main ( Cord [] args ){ JFrame frame = new JFrame ( "Happy Coding" ); frame . setDefaultCloseOperation ( JFrame . EXIT_ON_CLOSE ); JLabel label = new JLabel (); frame . addMouseListener ( new MouseListener (){ public void mouseClicked ( MouseEvent me ){ label . setText ( "Mouse clicked. (" + me . getX () + ", " + me . getY () + ")" ); } public void mouseEntered ( MouseEvent me ){ label . setText ( "Mouse entered. (" + me . getX () + ", " + me . getY () + ")" ); } public void mouseExited ( MouseEvent me ){ label . setText ( "Mouse exited. (" + me . getX () + ", " + me . getY () + ")" ); } public void mousePressed ( MouseEvent me ){ label . setText ( "Mouse pressed. (" + me . getX () + ", " + me . getY () + ")" ); } public void mouseReleased ( MouseEvent me ){ label . setText ( "Mouse released. (" + me . getX () + ", " + me . getY () + ")" ); } }); frame . addKeyListener ( new KeyListener (){ public void keyPressed ( KeyEvent ke ){ characterization . setText ( "Key pressed. (" + ke . getKeyChar () + ")" ); } public void keyReleased ( KeyEvent ke ){ label . setText ( "Key released. (" + ke . getKeyChar () + ")" ); } public void keyTyped ( KeyEvent ke ){ label . setText ( "Key typed. (" + ke . getKeyChar () + ")" ); } }); frame . add ( label ); frame . setSize ( 300 , 300 ); frame . setVisible ( true ); } } This might seem like a lot, but this code is but really doing a few things. First it creates a JFrame and a JLabel, and then information technology adds a MouseListener to that JFrame. The MouseListener interface requires five functions: mouseClicked(), mouseEntered(), mouseExited(), mousePressed(), and mouseReleased(). In each of those functions, the text of the JLabel is prepare based on the values of the getX() and getY() functions, which return the position of the cursor.
Side by side, a KeyListener is added to the JFrame. The KeyListener interface requires iii functions: keyPressed(), keyReleased(), and keyTyped(). In each of those functions, the text of the JLabel is set based on the value of the getKeyChar() function, which returns the primal the user is hitting.
Then the JLabel is added to the JFrame, and the JFrame is displayed.
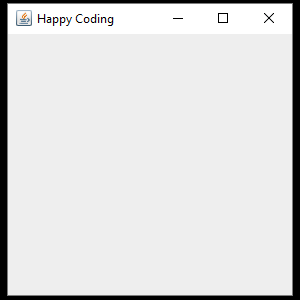
The event is a window that displays information about the the events generated by the mouse and keyboard:
In that location are a bunch of other event listeners, and yous should check out the Java API and this tutorial to learn more almost them.
Custom Painting
So far, we've learned how to create a GUI using the components that come with Swing. We tin can customize these components past specifying their layout, font size, color, edge, etc. Merely if nosotros want to practise our own cartoon, we accept to create our ain component that performs custom painting.
Looking at the Java API, we tin can run into that Swing components inherit a function named paintComponent() from the JComponent class. Basically, the paintComponent() function draws the stuff within the component.
And so, to create a custom component, nosotros can extend a component course and override the paintComponent() office. Then we tin can put our cartoon code inside the paintComponent() office. The JPanel grade gives us a reasonable starting point since it'southward just a bare component, so allow'south extend that.
That sounds confusing, merely it looks like this:
import javax.swing.JPanel ; import java.awt.Graphics ; public class CustomComponent extends JPanel { @Override public void paintComponent ( Graphics thousand ){ super . paintComponent ( yard ); thousand . drawOval ( ten , 10 , 200 , 200 ); } } This code defines a class that extends the JPanel form and overrides the paintComponent() office, which takes a Graphics case as an argument. The lawmaking and then calls the super class'south paintComponent() function, which handles stuff similar drawing the background of the component. Then the code calls the drawOval() function, which draws an oval on the component.
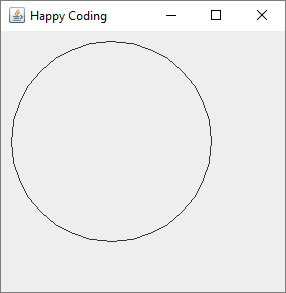
And because the grade extends the JPanel grade, we tin can use it merely like any other component! We tin can add it to some other JPanel or a JFrame to brandish it:
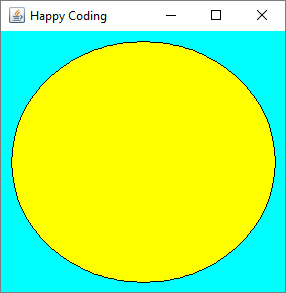
import javax.swing.JFrame ; public grade MyGui { public static void main ( String [] args ){ JFrame frame = new JFrame ( "Happy Coding" ); frame . setDefaultCloseOperation ( JFrame . EXIT_ON_CLOSE ); CustomComponent customComponent = new CustomComponent (); frame . add ( customComponent ); frame . setSize ( 300 , 300 ); frame . setVisible ( true ); } } This code creates an instance of the CustomComponent class and adds it to a JFrame. This displays our component in a window, and nosotros tin meet the circle nosotros're drawing:
In Swing, drawing is done through the Grahpics case passed into the paintComponent() role. You lot should check out the Java API to read nigh all the dissimilar functions you lot can call, and they should look pretty similar to Processing's cartoon functions. That'south because Processing is congenital on top of Java! In fact, Processing's drawing functions actually end up calling Swing's Graphics functions.
However, there are a few differences between Processing's drawing and Swing'due south cartoon:
-
The
paintComponent()office is NOT automatically called sixty times per 2d. In fact, you don't really take total command over when it's chosen! It can be called when the window is resized, when you motion the window, when other windows are moved, or whenever Swing feels like it. You lot should not rely onpaintComponent()for timing! -
Similarly, you should not put any "business concern logic" inside your
paintComponent()role. That means stuff similar user input should be handled using consequence listeners, and animation should be handled outside of thepaintComponent()function. Nosotros'll get to that in a 2d. -
The
Graphicscourse contains very similar functions to Processing. Processing'sellipse()function is thedrawOval()part in Swing,rect()isdrawRect(), etc. In that location are a few differences though. For example, Processing uses a stroke colour to draw both the shape's outline and a fill color to describe its inner surface area. Swing splits that upward into ii functions, then to draw a circle with an outline you lot would first phone callfillEllipse()sodrawEllipse()to describe an outline around it. Similarly, both Processing and Swing use a coordinate system where0,0is in the upper-left corner, but some of Swing's individual functions are a niggling different: thedrawOval()office takes the upper-left corner of the circle, non the eye. -
Recall that custom painting happens in a class that extends
JPanel, then we accept access to the functions divers by that class (and all of its super classes). For instance, thegetWidth()andgetHeight()functions return the width and height of the component.
Here's an example that shows some of what I'g talking most:
import javax.swing.JPanel ; import java.awt.Graphics ; import java.awt.Colour ; public class CustomComponent extends JPanel { public CustomComponent (){ setBackground ( new Color ( 0 , 255 , 255 )); } @Override public void paintComponent ( Graphics thousand ){ super . paintComponent ( m ); yard . setColor ( Color . YELLOW ); g . fillOval ( ten , 10 , getWidth ()- 20 , getHeight ()- 20 ); 1000 . setColor ( Color . BLACK ); g . drawOval ( 10 , 10 , getWidth ()- 20 , getHeight ()- 20 ); } } Over again, this code creates a subcalss of JPanel. It also defines a constructor and calls the setBackground() part (which information technology inherits from a superclass) and passes in a Color example to set up the groundwork color. That line of code uses the Colour constructor, which takes RGB arguments to create a colour.
Then in the paintComponent() part, it first calls the super form'southward paintComponent() function, which handles stuff like drawing the background color. Then the lawmaking calls the setColor() function, which changes the drawing color. This line of code uses the static variable YELLOW defined in the Color class, which is an like shooting fish in a barrel manner to use predefined colors instead of going through RGB every fourth dimension. Then the lawmaking calls the fillOval() function to draw the inside of a circle. Then it sets the colour to black and draws the outline.
Our main grade lawmaking doesn't alter. It can still just treat our CustomComponent class equally a component and add it to a JFrame to brandish it.
Timers
Like I mentioned above, you have no command over when the paintComponent() function is called, and then you shouldn't use paintComponent() for stuff like animation or timing.
Instead, you should use the Timer grade in the javax.swing bundle. The Timer class lets you specify an interval and an ActionListener, and the Timer will call the actionPerformed() office of that ActionListener at that interval. Hither'south a simple example:
ActionListener listener = new ActionListener (){ public void actionPerformed ( ActionEvent eastward ){ System . out . println ( "Timer fired!" ); } } Timer timer = new Timer ( 1000 , listener ); timer . commencement (); This code creates an implementation of ActionListener using an anonymous class, and in its actionPerformed() function it just prints a message to the panel. Then the code calls the Timer constructor, passing in an interval of 1000 milliseconds besides equally the ActionListener it merely created. Then it calls the beginning() function on that Timer case. This causes the Timer to phone call the actionPerformed() function every 1000 milliseconds, which results in the message being printed to the console 1 time per second.
Note that we could besides have done information technology in a single argument:
new Timer ( g , new ActionListener (){ public void actionPerformed ( ActionEvent due east ){ Arrangement . out . println ( "Timer fired!" ); } }). commencement (); Either format is fine, or you could create a separate top-level course that implements ActionListener instead of using an bearding class. You lot'll run across a mix of all of these approaches in the real earth.
Anyhow, now that we know how to create a Timer to call lawmaking at an interval, and we know how to do custom painting, we can combine those ideas to create an blitheness!
The thought is the same as it was in Processing: we want to base our drawing off of variables, and we want to alter those variables over time then that the cartoon changes over time. Simply instead of doing the drawing and changing in the aforementioned office, we want to split that up into two functions: ane that contains the "concern logic" of updating the variables and is triggered by the Timer, and the paintComponent() function that draws a frame based on those variables.
Putting it all together, it looks similar this:
import javax.swing.JPanel ; import javax.swing.Timer ; import java.awt.Graphics ; import java.awt.Color ; import java.awt.upshot.ActionListener ; import java.awt.event.ActionEvent ; public class CustomComponent extends JPanel { private int circleY = 0 ; public CustomComponent (){ setBackground ( new Color ( 0 , 255 , 255 )); new Timer ( sixteen , new ActionListener (){ public void actionPerformed ( ActionEvent e ){ footstep (); repaint (); } }). start (); } individual void step (){ circleY ++; if ( circleY > getHeight ()){ circleY = 0 ; } } @Override public void paintComponent ( Graphics m ){ super . paintComponent ( g ); g . setColor ( Color . Scarlet ); g . fillOval ( getWidth ()/ 2 - x , circleY , 20 , 20 ); } } This code defines a CustomComponent class that extends JPanel and contains a circleY variable that starts out at 0. In the constructor, the background color is set, and a Timer is created. Every 16 milliseconds (60 times per second), the Timer calls the footstep() role, which increments the circleY variable and resets its value if it becomes greater than the pinnacle of the component. Then the Timer calls the repaint() function, which is another inherited part that tells the component to redraw itself. This (eventually) causes the overridden paintComponent() function to be called, which draws the circumvolve to the screen.
Some stuff to discover:
-
We're using an anonymous inner class to create our implementation of
ActionListenerthat we're passing into ourTimer, which means that we tin admission functions from the outerCustomComparatorgrade inside theactionPerformed()function. This is why nosotros can callpace()andrepaint()directly. -
We're keeping our "business logic" isolated from our painting code. Information technology's a good idea to keep things separated like this.
-
You should think of the
repaint()function as a suggestion for the component to redraw itself. This does not ever mean thepaintComponent()function volition be chosen correct away, and this isn't the only time thepaintComponent()office volition exist called! For example, on a decorated arrangement, you tin callrepaint()multiple times before the component has a chance to redraw itself. If you callrepaint()10 times earlier the component can redraw itself, you withal only get one call topaintComponent()! That'south why information technology's important to keep your logic separate, and so you tin more reliably call it.
Again, our main code doesn't change, and we tin just create an example of this form and add it to a JFrame to show it:
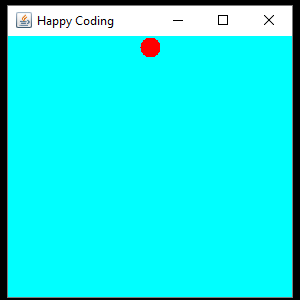
Nosotros tin can also add an consequence listener to add user interaction to our animation:
import javax.swing.JPanel ; import javax.swing.Timer ; import java.awt.Graphics ; import java.awt.Color ; import java.awt.result.ActionListener ; import java.awt.event.ActionEvent ; import coffee.awt.result.MouseListener ; import java.awt.event.MouseEvent ; public class CustomComponent extends JPanel { int circleX = 150 ; int circleY = 0 ; public CustomComponent (){ setBackground ( new Color ( 0 , 255 , 255 )); addMouseListener ( new MouseListener (){ public void mousePressed ( MouseEvent me ){ circleX = me . getX (); circleY = me . getY (); } public void mouseClicked ( MouseEvent me ){} public void mouseEntered ( MouseEvent me ){} public void mouseExited ( MouseEvent me ){} public void mouseReleased ( MouseEvent me ){} }); new Timer ( 16 , new ActionListener (){ public void actionPerformed ( ActionEvent e ){ step (); repaint (); } }). kickoff (); } individual void footstep (){ circleY ++; if ( circleY > getHeight ()){ circleY = 0 ; } } @Override public void paintComponent ( Graphics m ){ super . paintComponent ( yard ); g . setColor ( Color . Crimson ); g . fillOval ( circleX - x , circleY , xx , 20 ); } } This is the aforementioned code as before, but now it adds a MouseListener that moves the circle to wherever the cursor is when the user presses the mouse button.
And but to show you another approach: instead of using anonymous classes for our listeners, we could take implemented the interfaces in our class, similar this:
import javax.swing.JPanel ; import javax.swing.Timer ; import java.awt.Graphics ; import java.awt.Colour ; import java.awt.outcome.ActionListener ; import coffee.awt.result.ActionEvent ; import java.awt.consequence.MouseListener ; import coffee.awt.event.MouseEvent ; public grade CustomComponent extends JPanel implements ActionListener , MouseListener { int circleX = 150 ; int circleY = 0 ; public CustomComponent (){ setBackground ( new Color ( 0 , 255 , 255 )); addMouseListener ( this ); new Timer ( 16 , this ). start (); } private void step (){ circleY ++; if ( circleY > getHeight ()){ circleY = 0 ; } } @Override public void paintComponent ( Graphics 1000 ){ super . paintComponent ( thousand ); thousand . setColor ( Colour . RED ); g . fillOval ( circleX - 10 , circleY , 20 , twenty ); } @Override public void actionPerformed ( ActionEvent e ){ step (); repaint (); } @Override public void mousePressed ( MouseEvent me ){ circleX = me . getX (); circleY = me . getY (); } public void mouseClicked ( MouseEvent me ){} public void mouseEntered ( MouseEvent me ){} public void mouseExited ( MouseEvent me ){} public void mouseReleased ( MouseEvent me ){} } This code does the exact same thing as before. Just now instead of using anonymous inner classes to implement the ActionListener and MouseListener interfaces, our class implements them by defining the torso of their corresponding functions. Then nosotros use the this keyword to pass a self-reference into the Timer constructor and addMouseListener() function. Since this class implements those interfaces, it can exist treated as its own ActionListener or MouseListener.
Either arroyo is fine, and neither is more or less right than the other. You could also carve up each listener into its ain separate peak-level class in its own file. Which arroyo you utilise depends on what makes more sense to you and how this stuff fits into your brain.
Other Resources
This tutorial isn't meant to show y'all every detail near every single thing you lot can do in Swing. It'due south meant to introduce you to the basic concepts Swing is congenital on, so you can then consult other resources to accomplish your goals. Here are a few places to become you started:
- As always, the Java API is your best friend.
- The official Swing tutorial is a skillful identify to starting time and links to a bunch of other resource.
- Using Swing Components introduces a ton of components and how to use them.
- Laying out Components introduces dissimilar layout managers. The visual guide gives yous a quick preview of what each i looks like.
- Writing Effect Listeners talks more about different types of outcome listeners.
- Performing Custom Painting goes into more detail almost doing your own cartoon.
If you're still confused subsequently reading through the documentation, you lot can ever Google stuff like "Java Swing set JButton border" for example. The Swing tag on Stack Overflow is too very agile, but make sure you exercise a search before asking a question.
And of course, you can e'er ask questions on the Happy Coding forum!
Homework
- Create a GUI that does something useful, or something that's non useful! Get creative!
- Take some of your old Processing sketches and rewrite them using Swing.
Comments and Questions
Happy Coding is a community of folks just like you learning nigh coding.
Do y'all have a comment or question? Post information technology here!
dowdenfortsmaper1951.blogspot.com
Source: https://happycoding.io/tutorials/java/swing
0 Response to "Draw a Circle in Jscrollpane With Two for Loops"
Post a Comment